Friday, September 4, 2015

The Scanning Project-8: Scanner Terms and Important Specs


 There is no sense buying a scanner or making scans on a scanner that does not have the right tools for the work you intend to do. In this post I will cover the main specs to check and what I consider important benchmarks for a variety of projects you may have in mind. As an introduction to the terms, following is a brief description of each and why they are key elements in determining image quality. These will be covered more extensively within the context of the scanner workflow discussions in following posts.

Resolution: In essence, resolution is a prime determinant of how large you can create a print from the scanned image. Much like the megapixels in a digital camera, the larger the file produced the larger the potential enlarge-ability. Of course, other matters come into play, including the quality of the scanner lens and sensor, but given all other things are equal (which is rare) the higher the resolution you choose the bigger the file produced, thus the greater degree of enlargement.

Scanner resolution is expressed as pixels (or dots) per inch. The important thing to watch for is that the resolution is expressed as Optical Resolution. Some scanners are misleadingly labeled as having high resolution when actually what is being stated is the potential interpolated, or resampled resolution capability. This means the image is crunched, if you will, to extrapolate a higher resolution than the actual optical resolution.


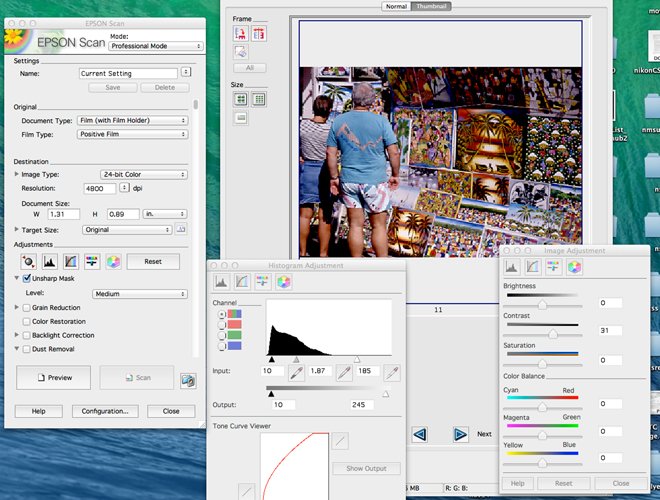
This is an image size dialog box from a scanner 35mm slide that was cropped slightly in scanning. The scan was made at 3200 dpi. The dialog box on top shows the scan when it has been converted to printing resolution, resulting in an 11x16 image size. Note that this can be edged up a bit using resampling at this stage, a topic covered in the workflow sections in later posts. 


Simply put, the higher the optical resolution the larger the image file. When selecting a scanner make sure it has a minimum of 4800 dpi; 6400 dpi scanners are becoming more affordable and are a good choice if you work mostly from 35mm film. But keep in mind that when scanning at 6400 dpi every sharpness and other flaw in the original will become quite apparent, like looking at yourself in a magnifying mirror in the morning. In addition, scanning at 6400 dpi can result in some very large image files, perhaps beyond your needs. It also can point out flaws in the lens that you used to make the photo that might not be apparent even when viewing the film through an 8X loupe.

Here's a scan from a 6x7 medium format negative. Note the larger image print size that can be achieved. This scan was initially made at 3200 dpi.


Bit depth: Again, as with digital cameras, you can choose the bit depth of the image, which means how many bits of information are captured within the three color channels of the sensor. You often have a choice of bit depths, such as 8-, 24-, 36- and in some scanners 48-bit.

Think of the difference between 16-bit RAW file and 8-bit JPEG images made in your digital camera. The 16-bit file simply has more image information available, which means you get a lot more potential out of the scan. But just as with resolution, the higher the bit depth the larger the image file, so consider the tradeoffs. For the most part, 36-bit will do the job, and for some end uses 24-bit and even 8-bit (for black and white images for web) may do just fine.

Dynamic Range: This is one of the main scanner specs to check. Dynamic range is a term you might be familiar with in the context of your digital camera. At the camera’s lowest ISO settings that range might be 10-11 f-stops, meaning that tonal values within that span can be recorded; the dynamic range of any camera inevitably falls as you raise ISO. In scanners, the measure is not f-stops but in something called Optical Density and is within a scale of 0.0 (white) to 4.0 (black).

Watch for how the scanner’s specifications (read capabilities) are expressed in Optical Density terms. A scanner that’s Optical Density falls between 2.0 and 3.0 may work for some prints and “quick” tasks, but generally there will be a loss of highlight and deeper shadow information—in other words, it is quite flat. Scanners in the 3.2 to 4.0 range are more suitable for the kind of work you might be interested in, with the higher number offering a better dynamic range capability. In other words, the higher Optical Density rating will bring out the most tonal (thus color richness as well) qualities of the image.

Flatbed or Dedicated Film Scanner?
There are two main types of scanners for photographers and those working with photographic images. One is a flatbed that can handle most film formats (35mm up to 8x10) and prints up to the platen size, the most common being 8.5 x 11”. Flatbeds can also be used to scan tintypes, daguerreotypes and glass plate negatives. A flatbed can be versatile, but if you have only 35mmn prints and negatives a better choice would be a dedicated film format scanner, commonly for 35mm but also available for medium format (120) film. 120 film scanners can cover all the 120 formats, including 6x6, 6x9 and even 6x17 negatives and slides. (Larger format dedicated scanners are strictly for professionals and will not be covered in this project.) Note that flatbeds can usually do a good job with 120 format and a reasonable job with film as well. How well depends on the scanner’s specs and build.

Thus, the scanner you choose is highly dependent on the type of images you want to scan. If you are a family photographer with lots of old snapshots and prints and only a few boxes of 35mm film, go for the flatbed. If your collection is primarily composed of 35mm film then go with a dedicated film scanner.


Quick Guide: Scanner Specs for Film and Prints
Here is a quick rundown of the scanner specs I believe are best for your work. Of course, budget and the volume of work you plan to scan should guide you, but scanning via a low-spec scanner is generally a waste of your time.

Optical Resolution: 4800 dpi; better: 6400 dpi
Color Bit Depth: maximum, 48-bits per pixel, 36-bit is usually fine
Grayscale Bit Depth: 16-bits per pixel
Optical Density: 3.4 minimum; best: 4.0
Light Source: LED
Platen Size (for prints): 8x10”; better: 8.5x11”
Film Holders and Masks: Dependent upon your formats, 35mm to 4x5” film
Bundled Software: Covered in the next posting


Next posting: Scanner Software

Thursday, August 27, 2015

The Scanning Project-7: How a Scanner Works


While this may be purely of academic interest, I thought it would be a good idea to demystify scanner mechanics a bit. Think of a scanner as a potentially high megapixel imaging device that converts image information from film or prints to a digital file. Just as in a digital camera, the image can be manipulated during the conversion process and given certain attributes, such as correction of color and enhancement through contrast and saturation choices.

For those who have not worked with a digital camera a scanner is akin to a copier. But the scanner does not have toner or nozzles to lay down the copied information; it creates digital image information that can be manipulated to mimic the copied image or to enhance or adjust as needed.

This Epson 850V scanner scans both prints and film using a flatbed design. This illustration shows slides in the film holder, which is then placed directly on top of the platen. 

In essence, a scanner contains an RGB sensor, just as in a digital camera that, in flatbeds, sits underneath a glass covering onto which the material is placed. Flatbed scanners have both fixed and movable mirrors and a movable light source. The movable mirror and light scan across the surface of the image and direct the results through a lens to the fixed mirror, which directs it to the RGB sensor. In essence, it “writes” the information as it goes. Depending on the quality of the scanner, the light source in a flatbed can be LEDs or some variety of a tube of light.

Film scanners differ slightly in how the image is captured. Strips of film or mounted slides are put into a holder that is then inserted into a slot in the scanner. In a flatbed the film is placed onto the glass platen within holders. When an image is selected for scanning in a dedicated scanner a stepper motor moves the frame across a lens that directs the image to the sensor.

Here's a Plustek dedicated 6x6cm film scanner. Frames and strips are placed into a holder that is then inserted into the film gate, which then "steps" the image across the scanning module. 

While the mechanics of a scanner are fairly straightforward, the software and capabilities of the sensor can vary considerably, depending on price and manufacturer. In the next posting I will offer some criteria that should be used to choose a particular scanner for the work you have in your collections. Scanner specs are important to understand as they will determine what you can and cannot accomplish in your work.

Every scanner works in basically the same fashion and there are a number of steps required prior to making the final scan. The first is a preview, a sort of large thumbnail (not full resolution) image, often called a “prescan.” While it serves as a rough guide to the image it should not be taken as what you could or should expect from the final scan, just as the image review on your digital camera’s LCD is certainly not what you will achieve after image processing later.

Once you have the prescan on the screen you can make various adjustments. The heart of the scanning process is the software through which you process the image. This involves choosing the resolution, the bit depth, noise reduction, dirt and scratch elimination, dynamic range, color balance and more. These choices will be examined in detail in the scanner workflow postings of this project.


Here's a screen grab of Epson's scanner software with many of the control modules opened. Image controls in software can be basic or quite sophisticated, but most allow you to make the kind of adjustments you need to create a good quality image file from the film or print you are scanning.

The changes you make to the prescan is where you set up the parameters of the scanned image, much as you set up the image-processor in a camera to deliver a certain look and resolution of a captured image. Scanning software can be quite sophisticated, and learning about its many options is key to creating quality image files from the original material.

By understanding what a scanner can deliver, and what program to utilize to get the best possible results, you will be well on the way to making the right buying decision and accomplishing your goal of archiving your precious film and print images.


Next posting: Scanner Specs

Tuesday, August 25, 2015

The Scanning Project-6: The Print, and Some Final Thoughts on Editing


Many folks have prints without negatives, mainly family photos from generations past, but there are also collectors and museums who have tintypes, albumen prints and even daguerreotypes. The quality of these items varies considerably, often showing signs of age due to fading, paper support deterioration and glitches in the emulsion surface. Scanning paper and other materials that support images is a fairly straightforward affair, and getting like copies is not difficult. The challenge comes in when you go to revivify, if you will, the image, a task that has been made easier with software retouching.

I am always amazed at the quality of very old prints that have been toned, and even black and whites that have been stored even under non-archival conditions. This carte de visite (about 5x7") was probably made in 1880s or so and was found in great condition. I scanned it in color to retain the sepia tone color and then did some minor retouching in software. 

 In the days when film was used for print copies, which I did commercially for many years, I would make a 4x5 negative with a copy stand setup and hand the print off, if needed and after I did my contrast and dodge and burn thing in the darkroom, to an airbrush and retouch artist, who would use the tools of their craft to reconstruct torn and damaged areas.

The success the job was heavily dependent on the original print condition and what I could do in the darkroom, and at times the results were more interpretations than true to the original image. At times the person bringing the image in for work would supply what details they had, such as eye and hair color and skin tone, and the artist would hand color the print. While the final look was at times more sketch-like than photographic, it still kept a treasured memory alive for future generations to come.

There was a time when I did a lot of hand coloring, adding photo oils to black and white prints. While the negative of this image is still in my files the only way to copy this unique treatment was scanning the print itself. The print is 8x10" so there was no problem handling it in one pass on the flatbed scanner. Image copyright George Schaub

 While the discussions here are not aimed at professional digital retouchers, I will go over some ways that an image can be enhanced and salvaged that are available to all with basic image editing programs later in these postings.

Naturally a flatbed scanner is used for scanning prints. Most of these that are not pro units offer letter size (8.5x11”) as the maximum scanning size. You can scan sections and merge larger prints later. You can also scan numerous snapshot size prints in one pass, then crop from the full scan to make corrections later. Some scanners/software can even ID individual snaps for you and create a file for each separate print; either way works fine, as you will not be sacrificing resolution whether you batch or scan individually.

There isn’t much to say about edits, as you can, with most scanners, get a virtual copy of the color and contrast of the print, and the only batch sorting you might want to do is between color and black and white and by print size. 

This is not a mistake in the way I scanned this photo I found in an old album at a flea market. The print image had gone full tilt and was very close to disappearing altogether. I scanned it first "as is."

To bring it back to life so that I could actually see the individuals in this group shot I made a simple adjustment when scanning to enhance the contrast, something I could as easily have done later in image processing software. The point is to not become discouraged when you find a poor quality print, as there are many ways to enhance and improve the image. If need be an image like this could be handed off to a pro retoucher but for me this result is mission accomplished. 


 Some Final Thoughts on Editing
Each of us has our own editing “eye” and that is certainly a personal matter. However, I could suggest that you begin the scanning process by working with projects. For example, you might want to start sorting into sections such as family, nature, florals, artwork, etc. or whatever makes sense to you. This way you can learn as you go and not feel overwhelmed by having to edit everything in your film and print files all at once. Harvest images selectively rather than trying to edit a lot of work at once.

Editing is an ongoing process (and by editing I mean dividing work into keepers, and maybes and outs) that will take time. But keep in mind that it is the most time-consuming part of this whole process, as it should be. Once you do your edits you’ll find that scanning is quite mechanical (after you learn the workflow) and easy. Scanning is an important creative process, and editing is at its heart.

How many images should you decide upon before you first begin scanning? That’s up to you and just how many images there are in your collection. I suggest that you begin with about 100, including good and not so good quality images.

You can make this your test run to become familiar with the scanner, the software and the best workflow. By working with a select group you will begin to see what you can and cannot accomplish and how you can or cannot salvage marginal images, and this will in turn feed back into your editing procedures and decisions.

To sum up:
Scanning itself is a mechanical process; although you can be creative in certain choices you make it is often best to simply scan to gain all the information you can from the material and then interpret as you will later. Scanning involves a set of decisions and commands that will affect the outcome, and each step is quite clear in its implications.

Editing is a creative process, where you make decisions about what images are meaningful to you. Editing is an emotional and aesthetic process. It becomes refined as you work through your images, and in itself is a wonderful way to revisit images you may not have looked at for many years.

There’s art in the science and science in the art of scanning, just like in photography itself.


Next posting: How a Scanner Works

Tuesday, August 18, 2015

The Scanning Project-5: Editing Color Negative Film


There were literally hundreds of types of color negative film, with various speeds, brands and emulsion stocks on offer. When these were mass printed in photofinishing labs, the equipment processing and printing the film identified those various stocks by their edge coding and made automatic color balance decisions accordingly. Sometimes this worked well and sometimes it didn't. 

But knowing the brand and type of color negative film you are scanning can be quite useful. You might be able to read the brand of film on the perforated strip. (See Posting 4 for a link to a site that ID’s numerous Kodak films by their codes. You can also Google a particular film or type. For example, googling Kodacolor--Kodak color negative film--will yield the years of manufacture and film codes, which can be helpful.) This information is used when applying film profiles to the scan and different profiles can be profoundly different in terms of color balance and contrast. However, knowing exactly which “vintage” (emulsion stock number) of film you are scanning is near impossible and there were variations (though they can be slight) depending on which emulsion stock number the film might have been.


This color negative film, scanned as a positive to show the orange mask, is not an easy "read" in terms of color, since both color and density are reversed and sit within an amber layer.

Here's an image of what the negative would look like when the amber layer is removed. By studying the positive (below) you can see how "reversed" colors (actually the complement to the positive colors) look. This takes some practice, although the easiest way to figure this out is to simply scan the negative, as a scanner will remove the orange mask effect in the process.


Here's the positive made from the scan. This exposure was made on Kodak VR 200, a film sold starting in 1984 and discontinued about 1986. The perf code on the film is CL, which when cross-referenced on Wikipedia led me to the film brand and type, which I used as the profile when scanning. 

While batching the types for scanning sets by film type in your initial edits is a good beginning, it is likely that you will have to fine tune the color balance yourself during scanning, which is not a difficult task, though it can be time consuming.

One problem of course is being able to see through the color mask that was incorporated in virtually all color negative film. This orange/amber coating was incorporated to enhance color reproduction, but also makes “reading” color negatives tougher than slides or black and white. Being a negative, the colors are “reversed", if you will, to their complements when the image is printed (color slide film is processed so the reversal takes place during processing via chemical or light exposure). All in all, the only way to see what colors you have (unless you have a very trained eye) is to scan the negative itself, which will eliminate the mask and make the colors positive.

When high speed films came out in the mid eighties they gave a newfound freedom to low light shooting. They did have their problems, however, as most were daylight balanced, many were quite grainy and contrasty, and I have found that the years have not been kind to their stability. This photo inside a Chicago blues club was shot in 1985 using Kodacolor VR 1000.

This is a scan from the print I got back from the lab at the time. Being daylight balanced, the film recorded an overall amber cast. I am unsure if the lab attempted to rebalance the light but I accepted it as the final output of the image at the time.  It was enough to be able to shoot in such low light without flash. 

When I scanned the negative I had to rebalance the color myself as there was no matching profile provided in the software for VR 1000. Knowing that the image was heavily influenced by artificial light I added blue and cyan and played a bit with the contrast. My aim was to produce an image that looked like it was shot with tungsten balanced film. 

However, color reversal and the orange mask are not the only issues with color negative film. In my experience, color negative films of older vintage suffer from density loss, color shifts (some are worse than others) and emulsion deterioration. There are three main color layers (CMY—cyan, magenta, yellow) within the emulsion itself, with some layers usually suffering more than others. Frankly, manufacturers did not do a good job insuring that color negatives would be “memories that live forever”, as the advertising claimed.

Of course, how you stored those negatives is also an issue, and if you stored them in shoeboxes you will probably have dirt and scratch issues to contend with as well. Not to worry, however, as color negative films can be put through dirt and scratch removal software algorithms, which will help. You can also manually clean the film by rewashing and immersing the film in PhotoFlo, or passing the film very carefully through a chamois cloth.

One option is to remove the worry about color by converting problem or poor color negatives to black and white. While this should be a last resort, it can help maintain the image if not the original color itself. Doing so you can deal with contrast and density issues and not worry about color balance.

Most software will offer a color profile of many types of commonly used color negative film. While these should be considered ballpark algorithms, they are a good place to start; in my experience you will certainly spend more time balancing color negatives film than you will when working with color slides.

So, batch the negatives as best you can according to film type and brand, check each frame with an 8X loupe and be prepared to hunt and peck to find the right color balance. We’ll cover profiling in the coming post on color negative step-by-step scanning.

My guess is that the vast majority of color negative films were shot with affordable cameras and in many cases the negatives are lost or simply tossed as being thought unnecessary. These photos are often the storehouse of precious family memories and should be scanned to protect and preserve them for future generations. I am always amazed at finding family photos in the form of black and white prints from over a hundred years ago that are still in very good shape, but mass produced color prints from only thirty to forty years ago that quite clearly are not. Scanning color prints (those with or without negatives) using a flatbed scanner is an easy matter. This print is from the 1970s and had already shifted color towards a magenta cast, alleviated somewhat by changing the color bias when scanning. 

Unfortunately, many people who shot color negative film of family and travel memories usually used other than stellar cameras and lenses. The plastic or hybrid lenses used in these cameras were notoriously soft and more than not automatic exposure modes, or guesswork, was used when shooting.


When scanning such images, expectations should be kept in check, although getting good scans for web sharing sites and even photo books—if image size is kept “reasonable”—allows these memories to be preserved. Frankly, in some cases scanning from the original snapshot print, if it’s not too far gone, may be a better strategy for such uses.